A Framed Magnetic Chalkboard
Happy Tuesday – let’s make a framed magnetic chalkboard.
I wanted to be sure to swing by today to share this little big project of mine that I’ve had finished for a couple of months now…
Long story short, Henry needed a place in his room to practice his letters and words, draw pictures, more specifically to draw out his “garbage machines,” as he would call them, all while being able to hang up his original works of art.
I immediately thought to myself, “magnetic chalkboard!” The idea originally came from my sister’s house, who, in her dining room, has half the wall painted with magnetic chalkboard paint.
It’s pretty awesome and her kids love it!
I decided to make Henry a framed magnetic chalkboard so that we can move it around his room, especially since I have a slight case of OCD when it comes to furniture arrangement…in all rooms of the house…including his…I have problems…
Ahem.
Seriously though, I love this thing. The kids love it, too! It’s so fun and soooo easy to make!
First of all, pick a size for your board. I went with a 3×4 piece of plywood.
There are smoother and lighter options out there. Although, I needed specific dimensions and I wanted it to be large enough so that both kiddos could be drawing at the same time without have a sibling brawl for coveted space in front of the chalkboard. <insert nervous laughter here> 😉
Once you have your board picked out, be sure to check for staples or knots in the wood. Find which side you plan to use.
You are now ready to paint – I highly suggest painting outside.
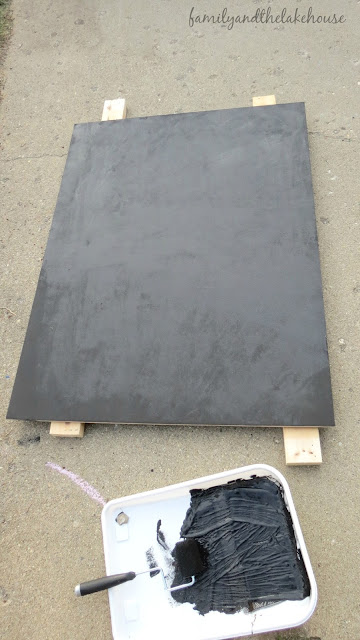
Like I said, this is a magnetic chalkboard, so I primed first with Rust-Oleum’s Magnetic Primer Paint. I knew I’d be stirring quite a bit, so I put on safety goggles in case I stirred too quickly and some paint splatter got in my eye. Safety first, right!?
This paint, after lots of stirring, should resemble the appearance of tar. So stir, stir, stir.
I applied two coats of the Primer and let it dry.
After a couple hours, I applied the actual chalkboard paint, which was, Rust-Oleum Chalkboard Paint. I was lucky to have some on hand over here, so I shook the can like I was preparing a martini, stirred it (despite what James Bond would have me do) and painted on two coats.
I needed a frame, so off to Home Depot I went. While there, I spotted this barn wood.
Have you seen these?
Have.You.Seen.These?!
Oh my stars, I was pumped – PUMPED, I say – to have found this barn wood in the store. I knew I wanted these to be the framing around my newly painted plywood!
I had them cut to size by an employee at Home Depot.
Easy Peasy.
Luckily, Jon had bought me a nail gun for my birthday, so I had these boards nailed down in seconds. Oh and can I just say how scary/fun it is to use a nail gun?! It was intimidating, to say the least, but once you get going, it becomes exhilarating! I’m sure Jon saw a side of me he’s never seen before…
Think Tim the Toolman Taylor, with a ponytail. Yeah. Totally me.
Grunt and all.
Haha!
Okay, so – here it is!
Ta-Da!
What do you think?
Oh and here’s some proof of my “nail gunning skills.” <—Yeah, it’s a thing.
Stay tuned for a tour of Henry’s bedroom, featuring this magnetic chalkboard!
Thanks for stopping by today, guys!
Marie 🙂
I’m linking over at at Totally Terrific Tuesday and Creative Gallery Link Party and Inspiration Gallery and Work It Wednesday.
*This post contains affiliated links.


Marie, it's beautiful!! That barn wood is gorgeous!! Thanks for the PSA… I'll have to check our Home Depot to see if they carry it, too!
I can't wait for another room tour! SOOOOOOOOOOOOOOOOOOOOO excited!
So much fun! Thank you for sharing this project! XOXO
How did I not see this before!!? I didn't know Home Depot has barn wood!! This turned out amazing! Great job!
So cute! Did your magnetic primer still work after applying the chalkboard paint? I've read they "cancel" each other out. How strong is the magnetic pull?
This is awesome! How did you hang it??