
Stenciled Number Chairs
If you follow me on Instagram then you may remember a picture from a couple months ago of me re-painting our dining room chairs. Well, I’m finally kinda-sorta done with them. I have yet to apply a coat of polyurethane. However, I just couldn’t wait another minute to share these chairs with all of you.
These chairs were purchased about seven years ago for $8.00 total from a beautiful Victorian home located here in our town. The matching table was also purchased. Unfortunately, I didn’t have a way to get it in my car at the time, so I left it there. Sad face.
………Actually, now that I think about it, I believe I told the homeowners that I’d come back to get the table in hopes that I could find a way to bring the table home. Hmm…Hopefully they weren’t waiting too long for my return. Oops! 😉
Long story short, these chairs cost next to nothing and I recently decided to give them a makeover!

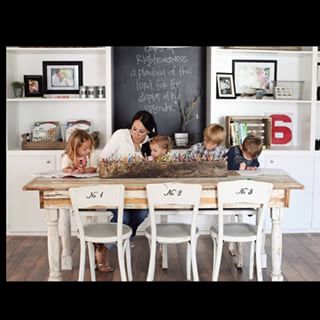
I was inspired to do this project by an Instagram picture posted by the amazing Joanna Gaines. I also loved what she had to say about her home:
 |
| Source |
“At one point I noticed my kids weren’t thriving in the home bc the space was too perfect for them to play in. That was the defining moment for me with design. From that point forward I was inspired to create a space where my family could thrive and let the imperfection be the beauty bc no one really wants perfect at the end of the day.” -Joanna Gaines
Awesome-sauce, right?
Awesome-sauce, right?
I couldn’t agree with her more. I always noticed the crumbs and dust in and on the chairs. I noticed smudges and I always found myself wiping and cleaning them. I couldn’t let them be just chairs. The chairs looked too…………..perfect. They needed more…………..imperfections.
I also needed that awesome crayon-holder-thingy and a photographer to capture all of us having a coloring contest!
Let’s start with the chairs! 😉
Here’s a before picture:

After:

Now, let me start by saying that I was too cheap to go and buy a bunch of chalk paint, so I took upon myself to mix up a batch of homemade paint.
I found a recipe using white wall paint and baking soda. Yes, baking soda! It worked great.

As for the stenciling – I found the perfect sized stencils from our local grocery store. I stenciled the backs of the chairs with some black paint that I already had on hand. After it dried, I carefully dabbed a small amount of white paint over the black paint to diminish the boldness of the numbers.
Oh and in case you’re wondering, each number represents the day of the month of each family member’s birthday. The chair below belongs to Little Miss. Eliza.

So there you have it! My Stenciled Number Chairs.
We’re off to bust out those coloring books and crayons now! See ya’ later fake plants and lanterns, there’s a coloring contest about to go down!
Thanks for stopping by!
XOXO,
Marie 🙂

![]()
Those chairs look amazing, great job Mama!!
GIRL! These turned out amazing! Our chairs in our breakfast nook actually look very similar to these in an espresso color, and I've been toying with the idea of painting them white. I will definitely have to look into your painting method! White wall paint and baking soda?? Amazing! Thanks so much for the tip!
Thanks, girl!
Thanks so much! Yes, I should probably do a follow-up post showing how I painted them. It was pretty simple and cheap, just time consuming! It'd be awesome if you did the same thing. I'd love to see it! 🙂
Those chairs look so great. The white color definitely brightens up the space, and I love how you chose those numbers 🙂 Wonderful DIY success!
Looks so cozy, I love!
Thank you, thank you! 🙂
Thanks. It feels better. LOL! 😉
I absolutely loves these Marie!! They turned out great and I love how you did the numbers based on birthday's!!!